BigCommerce is a powerful e-commerce website-building solution that enables individuals and businesses to run their online stores with ease. It provides an online store with everything a company needs to easily and effectively create, manage and launch a website.
With BigCommerce, companies can create a website with a variety of storefronts such as mobile, tablet, or desktop. However, before you set up a BigCommerce store, it is important to check out some benefits of BigCommerce and the process of setting up a store.
In this article, we will have a detailed overview of the BigCommerce solution and give you a guide on how to set up a BigCommerce store on your own.
Advantages of BigСommerce store:
BigCommerce is one of the most popular ecommerce platforms globally. Merchants choose to run their online store on this platform because of its ease of use, its customer support, its nicely customizable design, and its competitive pricing.
Mobile-friendliness
Mobile shoppers are growing in number and spending more money than ever. More than 50% of online shoppers use their smartphones to make purchases. To be competitive in this market, your business needs to be mobile-friendly. If your website doesn't work on mobile devices, you will be losing half of your potential customers.
It’s not a difficult task, but it does take time and effort. You’ll need to optimize your website for all devices and consider using a mobile-friendly plugin or theme.
BigCommerce allows you to create mobile-friendly pages with AMP (Accelerated mobile pages) technology. It speeds up the loading of heavy website elements on mobile devices, improves SEO ranking and conversion.
Scalability
As your business grows, you’ll need to scale your website and respond to changes in demand. BigCommerce is the perfect platform for you to do so. BigCommerce offers several features that make it one of the leading e-commerce platforms in the world.
-
SaaS features
BigCommerce is a SaaS solution that provides you with hosting and a variety of tools for maintaining your shop. By purchasing the BigCommerce license, you will not have additional expenses.
-
Integrations
BigCommerce includes pre-built integrations with tools you rely on to run the everyday process of your business. With a pre-built integration, you can use the tools you rely on like ERP, CRM, PIM, e-commerce, and marketing automation. Plus, you can easily add new integrations as needed.
SEO features
Search engine optimization (SEO) is a way to attract organic traffic to your website. It can be done by optimizing your site for keywords, writing high-quality content, following web-friendly best practices, and more. BigCommerce has a variety of SEO tools that will make your site rank well in search engines:
- URL optimization
BigCommerce automatically generates unique SEO-friendly URLs for each product, category, and all other pages. You can also change the URL settings.
- Microdata
BigCommerce inserts microdata or “rich snippets” into your product page to improve the search result listing
- 301 redirect
If you rename a product, BigCommerce will adjust the website by generating the new URL and setting the redirect. It will help the search system to better crawl your website.
How to create a BigCommerce website:
BigCommerce offers a 15-day free trial, without the need to attach a credit card. It is a great way to learn all the features of the platform. Use the trial to set up your online store. However, you’ll need to sign up for a paid plan in order to launch your store. Now we will offer you a brief guide on how to create an online store using BigCommerce.
1. Create a BigCommerce Account
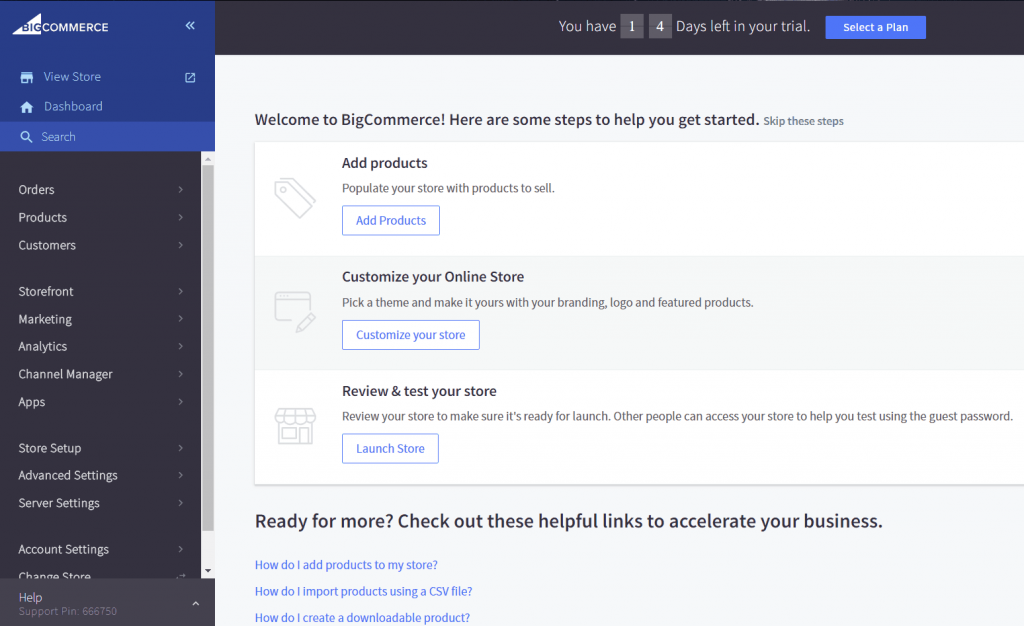
Before you can start building your online store, you need to create a BigCommerce account. Once you have created a BigCommerce account, you will be taken to your dashboard where you can see an outline of recommended steps to launch your online store.
2. Add users, if needed
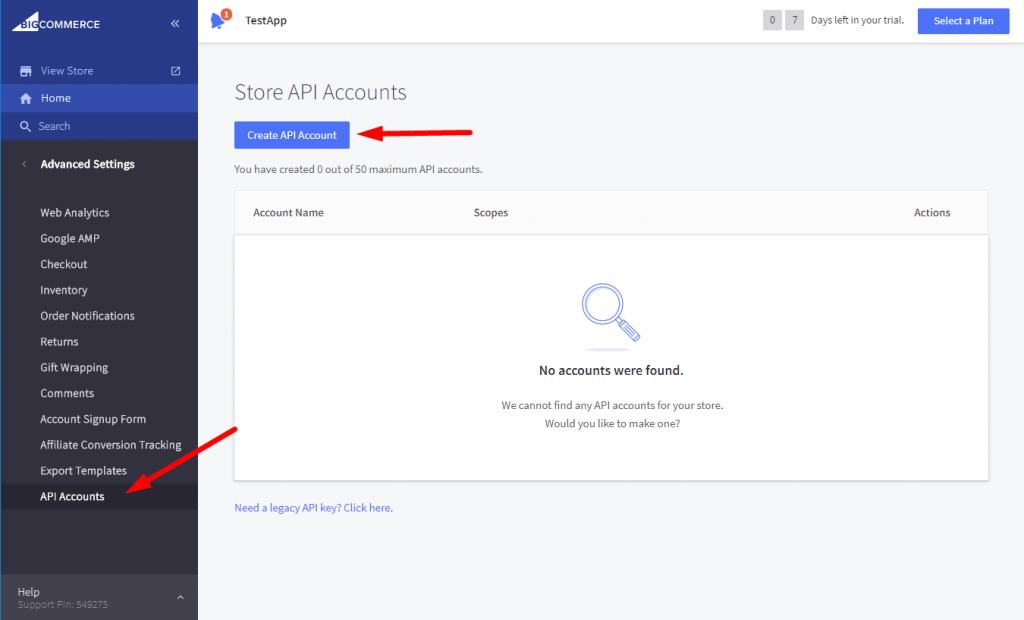
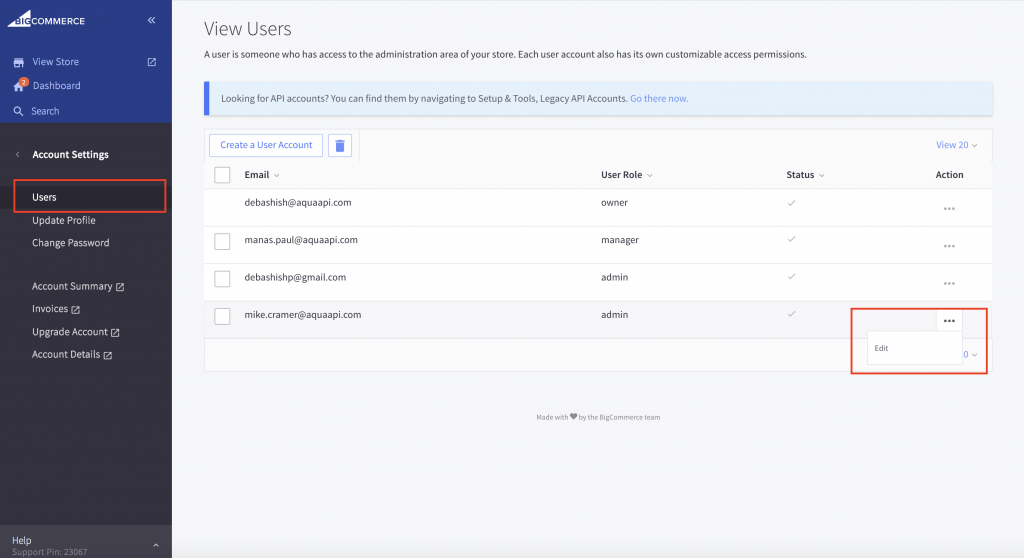
After you have set up your account, you will need to create an account for every collaborator you will be sharing your store with. To create additional users, go to "Manage Users." This will allow you to manage the installation of each user's account and their material. You will also get notifications from each user's account, which account you need to contact for any issues.
3. Configure the store settings
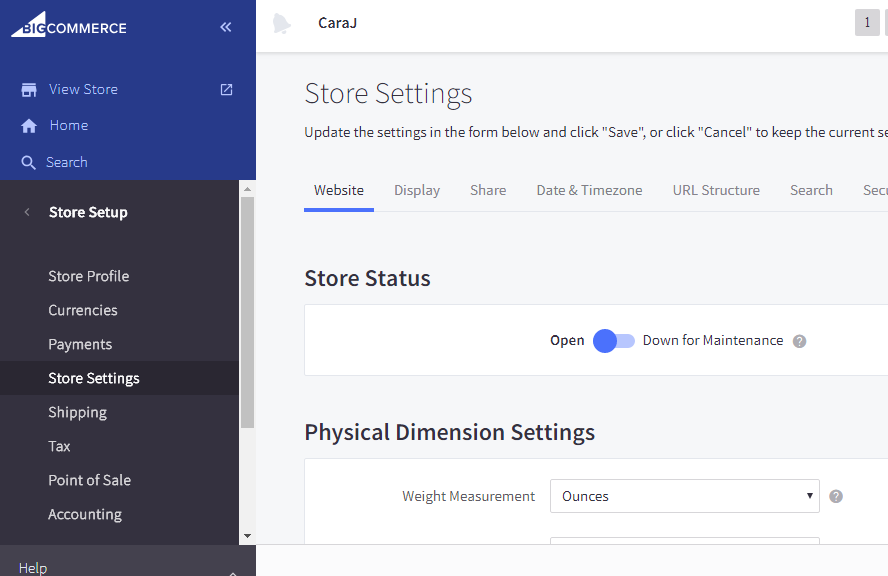
The Store Profile is where your basic store information is entered, like your store name, country, and contact information. Click on Edit Store Details and change the store name, country, and contact information.
4. Make product categories
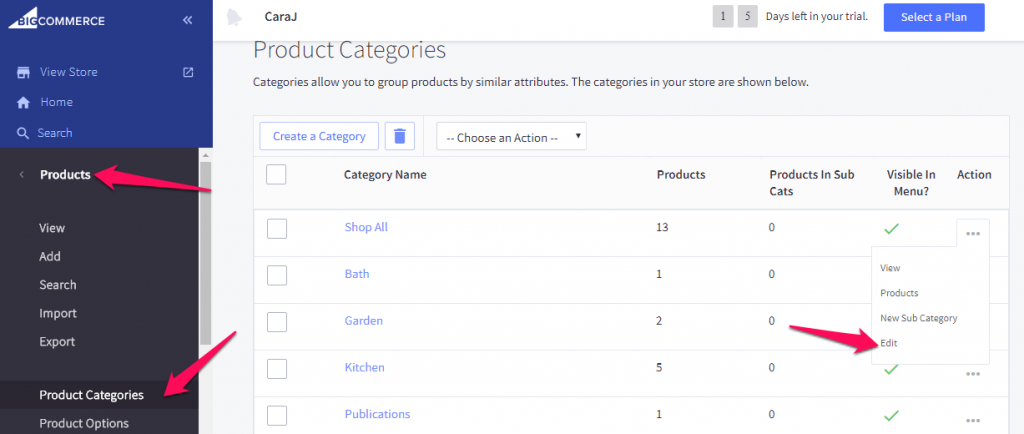
Product categories are a must as they help visitors navigate your shop easily. As a bonus, they also help Google understand the structure of your site, which means adding categories could help you rank higher on Google.
To add new product categories, go to the control panel and click on the Products tab. Next, click on Product Categories. You will see the product categories that are available for your demo store. If your store is similar to the categories listed in the demo, then you can simply keep them.
However, if you have any products that don't show up in the demo, then you'll need to create new categories. Creating a new category, click on the Create a Category link. BigCommerce will offer you eight fields where you can add information about the new category: Name, Description, Parent Category, Parent Category URL, Parent Category ID, Parent Category Category ID, Parent Category Type, and Parent Category Status.
5. Add products to the store
To add a product to your online store manually, navigate to the Add Product screen by clicking on “Add” on the Products navigation bar on the left side of your screen. You will go to the Add Product dashboard and hit the "Add product" button. To add a product from a category, click on the category you want to add the product to, click on the product and then click on the “Add” button.
You will see a menu for entering different product information:
- Basic information (product category, type, brand, weight, price)
- Product description (text description of product features and benefits)
- Images and videos (here you upload the multimedia files)
- Product identifier (you can enter a unique identifier like Universal product code (UPC or Global trade number (GTN)
- Pricing (here you enter price excluding taxes. You can also add the advanced pricing information, like wholesale or sale cost, bulk discounts, etc)
You don’t have to fill in all the product information fields. Think, which one will help you to sell the products. For better customer experience, try to add the same fields for similar products in the store.
6. Set up your payment methods
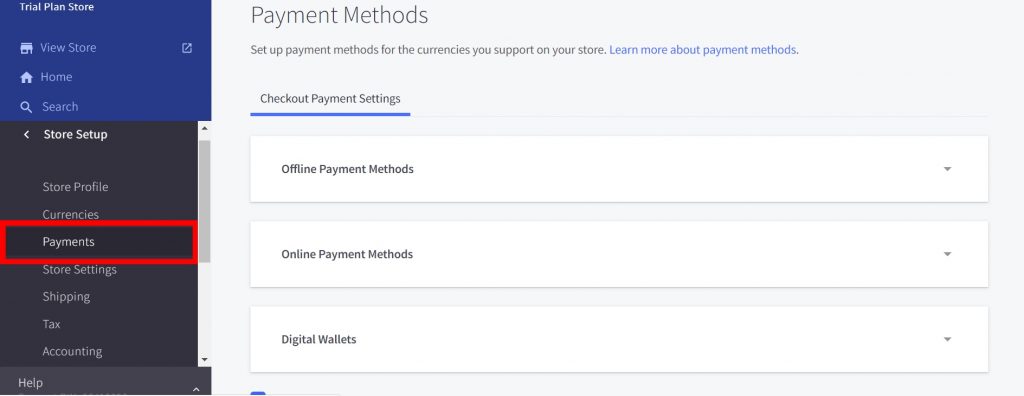
To set up your payment methods in BigCommerce, navigate to Store Setup and then to Payments. Here you can create the payment methods that you want to use by adding the payment methods to your store’s profile. If you need to create a payment method that isn’t available in BigCommerce, you can also create a custom payment method.
If you don’t have a payment provider or merchant account already set up, BigCommerce offers a built-in payment processor that allows you to accept payments from your customers.
Here are the most popular payment methods for BigCommerce sites:
- Payment gateway systems (Square, PayPal, Stripe)
- Merchant service account (Chase Merchant Services)
- Digital wallets (Visa Checkout, Apple Pay, Google Pay, etc.)
- Offline payment methods (cash, in-store payment)
With the abundance of options, each customer can pick the one that suits best.
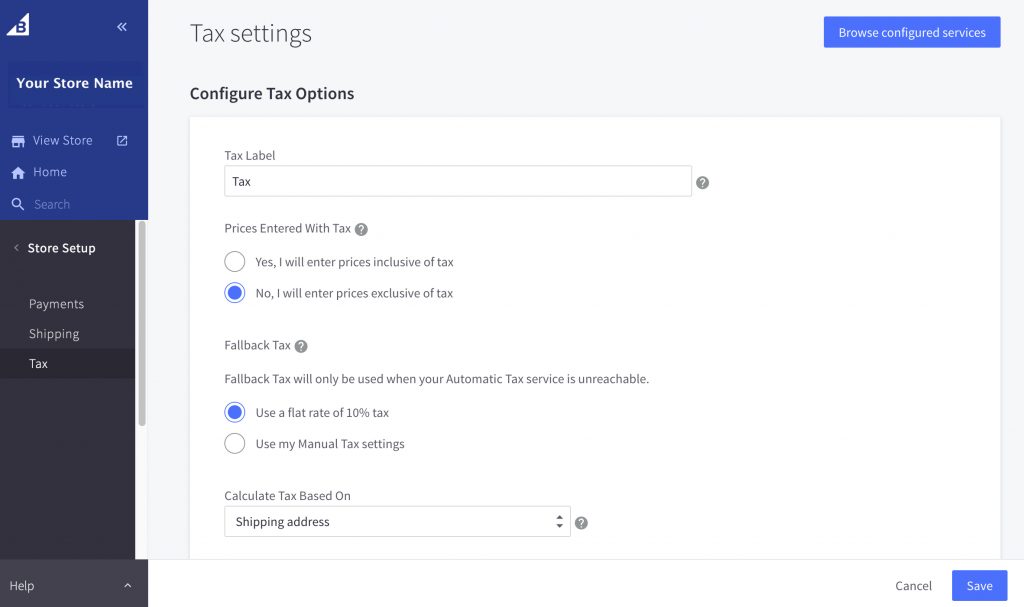
7. Configure your sales tax
BigCommerce offers a few different options for sales tax. For example, there is a choice between a manual tax, which is set by you, and a pre-configured, set-and-forget option. For the pre-configured option, you will be provided with all the information needed. The default tax setting is Manual Tax, which can be edited at any time. There are also a few other options that you can choose from.
8. Customize shipping options
To set up your shipping rates and methods, you'll need to first navigate to the Shipping screen in the admin area. Here, you'll be able to set what shipping rates and methods you want available for your store. BigCommerce ships for free with BigCommerce Shipping, the industry-leading service powered by ShipHawk and Parcelcast.

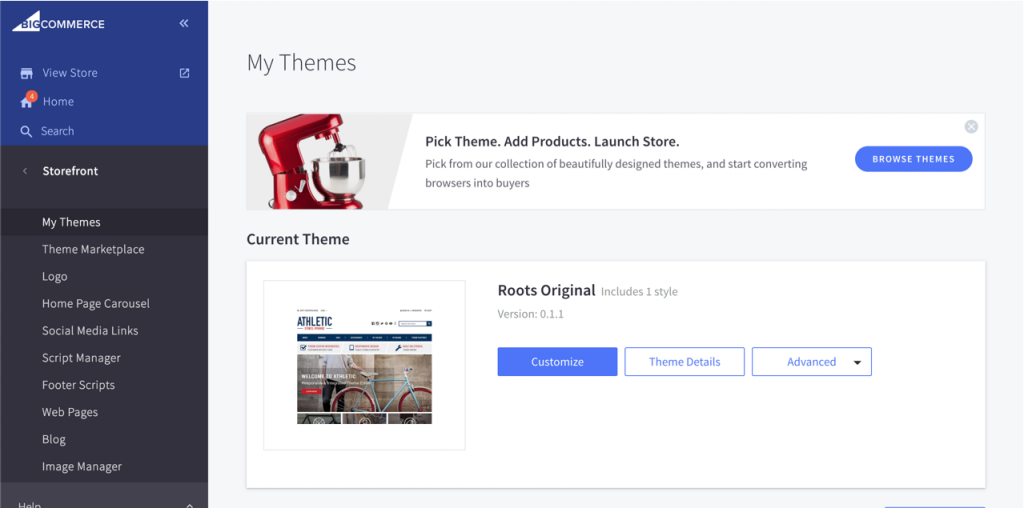
9. Configure the theme
BigCommerce uses themes to control the overall design, look, and feel of your online store. The default theme for your BigCommerce Store is called Cornerstone, which offers a simple yet functional layout that’s suitable for a variety of online shops. While Cornerstone is the default, you can design your store to suit your needs with the use of themes.
You can also customize the colors and branding of your store with the use of themes. These themes are accessible by visiting the Theme Manager located in the Store Admin area of your BigCommerce website. Themes can be downloaded by clicking on the Download Theme button on the Theme Manager page.
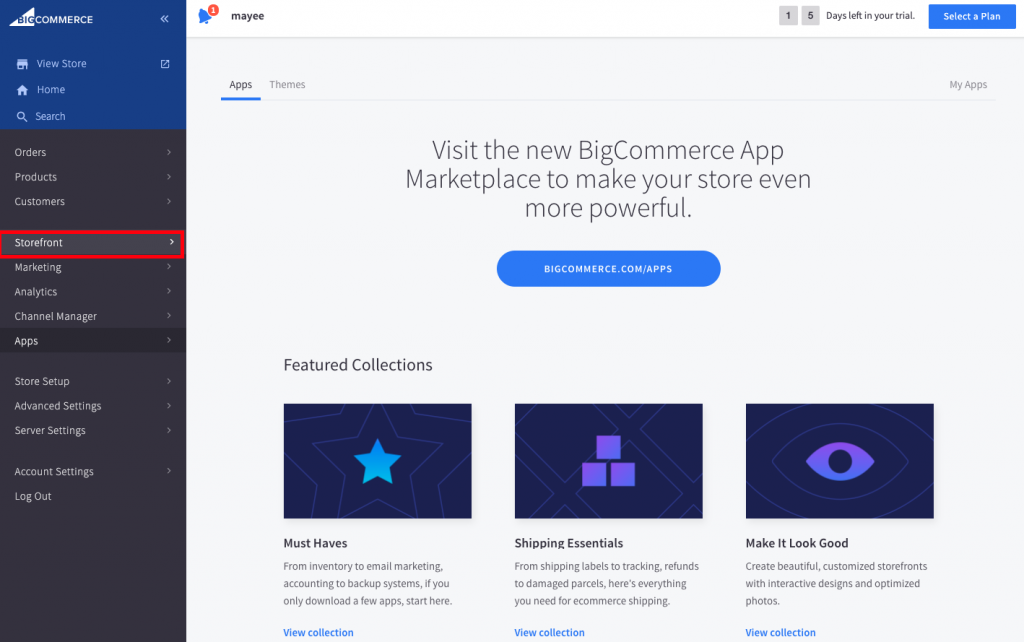
10. Create the store information page
The store information page is a page that you'll need to have on your site that will have information about you, your company, your products, and your contact information. To create the store information page, click on the Storefront > Web Pages section.
11. Add menu
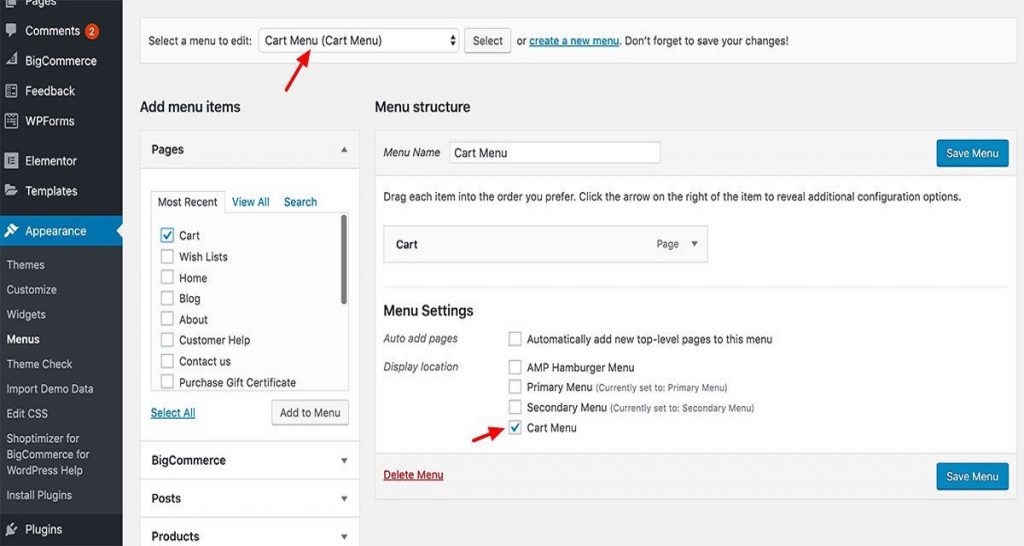
Return to your theme settings and select Customize to begin the theme customization process, which includes navigation editing. Menu pages can be added to the header, menu links, and menu items. They can be created by clicking on the menu item in the header and entering the text, caption, and link.
The categories you created will appear in your main navigation menu. If you want to hide them, you can do this by clicking the Visibility button and deselecting unnecessary items.
12. Add links to social networks
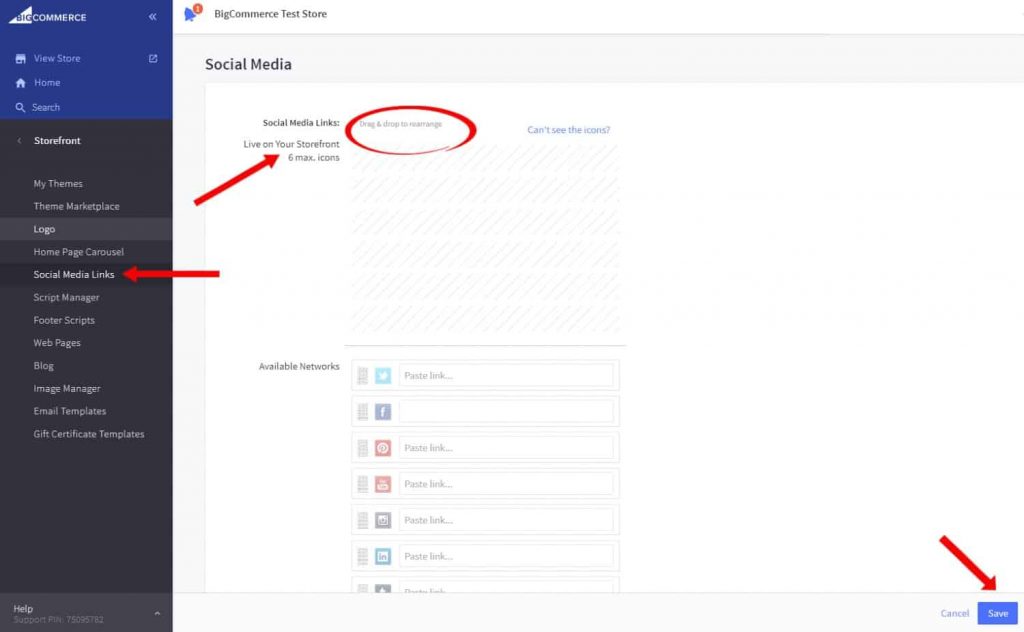
The social media links section allows you to add up to six social media links to your online store. This is useful for promoting your brand on social media and for bringing traffic to your website.
If you want to add your social media links to your store, go back to the Storefront option on your control panel and navigate to Social Media Links. Next, go through the Social Media Links page, and click on the social media network that you want to add. Finally, choose to Add to Storefront.
13. Preview
Previewing your store just before you launch is important. It is a chance for you to make sure that your online store is set up the way you want it to be and that it says what you want it to say.
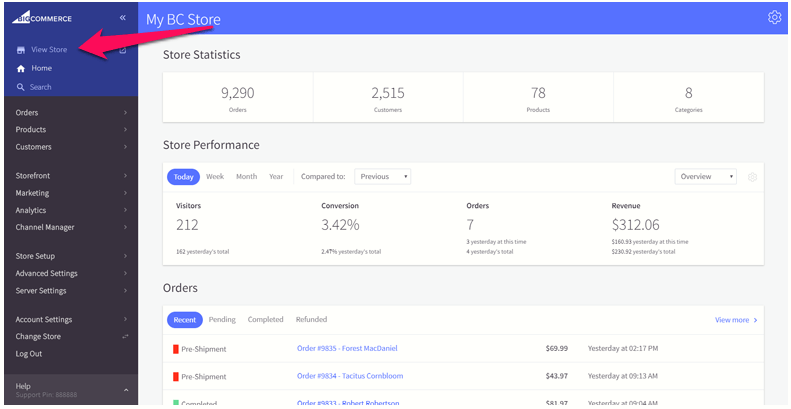
To preview your store, simply click on the View Store button in the BigCommerce control panel. You will be taken to a live version of your store that you can use to make changes and see what your audience is experiencing.
14. Publish your store
After you’ve completed the steps provided in this article, you’re ready to launch your store. Before your site goes live, though, you’ll need to upgrade your trial to activate it. Access this from your home dashboard by clicking the Upgrade Your Trial button. Once it is done, the button will change to read Publish.
Why hire a BigCommerce development team
Even if you think you can develop your site on your own, we recommend you consider hiring a professional BigCommerce developer. Our developers perfectly understand the BigCommerce structure, already have experience in building the shops for different brands, and know what will work better. Here are some benefits of hiring a professional BigCommerce development team:
- The professional look of the site
You want your online store to look professional and have perfect performance. In cooperation with designers, the team will create a user-friendly interface and optimize it for the best performance.
- Uptime guarantee
The BigCommerce development team is committed to always being available to take care of your website. If BigCommerce launches a big update, the engineers will make it run smoothly for your online store.
- Cost-efficiency
Having experience working with many businesses, the BigCommerce developers can offer you the most suitable solution and help to avoid costly errors.
Conclusion
We hope you enjoyed our article on how to set up a BigCommerce store. If you were looking to create a BigCommerce store on your own, you now know all the ins and outs of BigCommerce! If you need further assistance, please contact us.
